This is an excerpt from the November/December 2013 issue of InTech magazine by David K. Porter, P.E., is the division vice president, Crystal business manager at AMETEK. To read the full article, please see the link at the bottom of this post.
Within the pressure measurement industry, relentless innovation has become the norm. New technology continually supplants the old. In other technology spheres, PCs pushed aside typewriters. Cell phones drove out telephones. And today, reference recorders are shaking up old standards in the oil and gas industry.
A reference recorder is a new class of instrument that is gaining ground over other common pressure instruments. Chart recorders, deadweight testers, and analog pressure gauges all brought several advantages in their time. Increasingly, reference recorders replace all three with a single instrument.
What is a reference recorder?
Reference recorders unify the recording capability of a chart recorder, the high accuracy of a deadweight tester, and the continuous measurements of a pressure gauge into one tool that is easier to use and less expensive.
On their own, none of these features are unique, but when you put them all in the same device that reduces cost, it is something really useful. These reference recorders are effective for both laboratory and field applications. While data logging devices are nothing new, improved microprocessors allow today's reference recorders to read and record faster and more accurately than ever.
Reference recorders detect readings from modules, which may read pressure, temperature, current, or voltage, and store the data in their digital memory. These modules are usually interchangeable, and recorders generally accept two inputs at a time. In addition to their compact size, reference recorders offer several improvements to bulky chart recorders.
Improving on a chart recorder
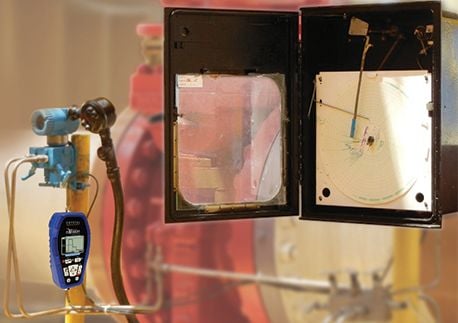
Chart recorders, originally patented in 1915, produce a graph on a moving paper chart. They rely on ink pens mounted on mechanical arms, which pivot in response to pressure. Their primary advantage is their ability to record for extended periods in remote locations. Chart recorders may be battery powered or entirely mechanical (requiring no external power), allowing them to operate in hazardous locations.
An experienced user may provide preliminary analysis of the output from a chart recorder in the field. However, communicating or storing this data electronically becomes possible only after a technician enters or scans the chart into a computer. This process typically takes several days. Chart recorders usually claim an accuracy ranging from 0.25 percent to 1 percent of span, but that figure depends on changes in ambient temperature and on the thickness of its pens-which can cause an additional error up to 1 percent of the recorded reading. Chart recorders are also susceptible to additional errors caused by overpressure and can easily be damaged if dropped.
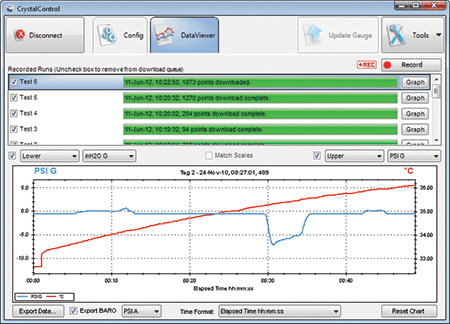
By contrast, a reference recorder exports digital data in a familiar spreadsheet that can be easily shared and understood by multiple users. Accuracy remains consistent with temperature changes, is protected from high overpressure events, and is not affected if the gauge is dropped. Despite being battery powered, reference recorders are also rated intrinsically safe for use in hazardous locations.
New regulations in many industries require that safety tests be documented in an electronic format. Some even require that the files produced are in a tamperproof, secure file format. Reference recorders can save the digital data in a signed pdf file, which produces read-only files that cannot be manipulated.
Any PC can download the digital data from a reference recorder.
Using deadweight testers in the field
Deadweight testers are used primarily in a laboratory setting. They produce a repeatable reference pressure by balancing calibrated masses on a piston of known area. Operators must use a different set of masses for each engineering unit (i.e., one set of weights for pounds per square inch [psi], another for kilopascal [kPa]). In an indoor, temperature-regulated environment, deadweight testers can be very accurate-serving as a primary standard for the calibration of other pressure measurement devices. Field versions also exist but, outside the lab, their accuracy depends on a host of factors.
To deliver an accurate reading, a field deadweight tester must be perfectly level. Additionally, ambient temperature, humidity, wind, and local gravity will all affect the reading. Without adjusting for these, a field deadweight tester's accuracy may be no better than a common pressure gauge. Even with these compensations, a field deadweight tester cannot actively detect or record changes in pressure; it only offers an accurate reference pressure for comparison.
A reference recorder serves two purposes. First, it stores readings continually, with update rates up to 10 readings per second, and allows the operator to record an entire test from start to finish; second, it provides a consistent, accurate reference for field calibrations. Measurements from modern reference recorders are independent of local gravity or humidity and produce their accuracy via a proprietary mathematical algorithm that corrects for ambient temperature. Achievable accuracies range from 0.025 percent of the indicated reading at lower pressures, to 0.1 percent of reading up to 15,000 psi.
A good reference recorder's accuracy should not change with temperature across its operating range. This is where recorders vary widely. The best manufacturers will provide proof of their accuracy claims, with a calibration certificate from an accredited lab, showing test data at different temperatures.
Replacing multiple pressure ranges
Pressure and temperature gauges are widespread and varied in form. Gauges will continue being useful for years, because of their portability, customizability, and affordability. In contrast, their drawbacks stem from their inherent fragility and the necessity to carry multiple gauges to cover a given pressure range.
Linearity and ruggedness are the two most important features of any pressure gauge. Many pressure gauges would be useful across a much larger pressure range if their sensors were more linear and predictable. Also, many gauges continue to display readings that appear accurate, even after their sensors sustained damage.
To overcome these challenges, reference recorders extend their usability by accepting different modules, each of which covers a wide pressure range. Within each module range, a reference recorder will have superior accuracy and linearity, compared to most pressure gauges. The advanced self-diagnostics in a reference recorder prevents the device from displaying an invalid reading if it sustains damage.
Reference recorders offer a reliable improvement over the decades-old technology commonly seen in the oil and gas industry. Replacing chart recorders, deadweight testers, and older pressure gauges with reference recorders helps companies reduce their equipment costs, training time, and operator error.
About the Author David K. Porter, P.E., is the division vice president, Crystal business manager at AMETEK. He has more than 25 years of experience; the last 13 years were spent in the test and measurement field developing rugged, highly accurate, and easy-to-use instruments. He has a degree in mechanical engineering from California Polytechnic State University, San Luis Obispo, where he is still active on the Industry Advisory Board.


